What Is Emergency Preparedness?
Emergency preparedness is the process of building systems and supplies that let you maintain safety, shelter, and basic needs when infrastructure fails—whether from natural disasters, power outages, or regional emergencies. It’s not about doomsday scenarios. It’s about reducing dependence on systems that regularly fail during hurricanes, wildfires, ice storms, and grid failures.
I’ve spent three decades guiding people through backcountry situations where help wasn’t coming. The skills that keep you alive in the wilderness—water management, shelter building, fire starting—translate directly to home emergency prep. The difference is you have more resources at home, but also more vulnerabilities most people never consider.
This guide covers the five core systems every household needs. I’m skipping the fear-mongering and the tactical fantasy gear. This is what actually matters when the power goes out for a week or you need to evacuate in 30 minutes.
How to Start Prepping: The Foundation
Most people approach emergency planning backwards. They buy a bunch of gear, stuff it in a closet, and call it done. Then when something happens, they realize the batteries are dead, they don’t know how to use the water filter, and their “bug-out bag” weighs 60 pounds.
Start with threat assessment. What actually happens where you live? If you’re in Florida, hurricanes and flooding are real threats. Blizzards aren’t. If you’re in Minnesota, flip that. Wildfire zones need evacuation plans. Tornado alley needs shelter-in-place systems. Don’t prep for every disaster movie scenario—prep for what your county emergency management says happens in your area.
Look at your last five years of local news. What caused power outages? What made roads impassable? What sent people to emergency shelters? That’s your threat profile.
Second step: audit your current capability. Right now, without going to a store, how long could you maintain your household? Most people discover they’re 48-72 hours deep at best. No judgment—that’s just the baseline. You’re building from there.
Water: The 72-Hour Minimum
You need one gallon per person per day for drinking and basic hygiene. That’s not a suggestion from a blog—that’s the FEMA standard, and it’s actually conservative if you’re in a hot climate or doing physical work.
For a family of four, that’s 12 gallons for three days. Twelve gallons weighs 100 pounds. This is why “just buy bottled water” isn’t a complete solution. You need storage and rotation systems.
I keep water in three layers:
Layer 1: Ready-to-drink. Five-gallon jugs and cases of bottled water. I rotate these through normal use every six months. Mark the storage date with a Sharpie. Municipal water doesn’t go bad, but plastic can leach if it sits in a hot garage for years.
Layer 2: Stored bulk water. I use food-grade 55-gallon barrels in the basement. Add 1/4 teaspoon of unscented bleach per gallon when you fill them. These can sit for a year, but I refresh annually. A barrel wrench and siphon pump are essential—you can’t tip a 400-pound barrel.
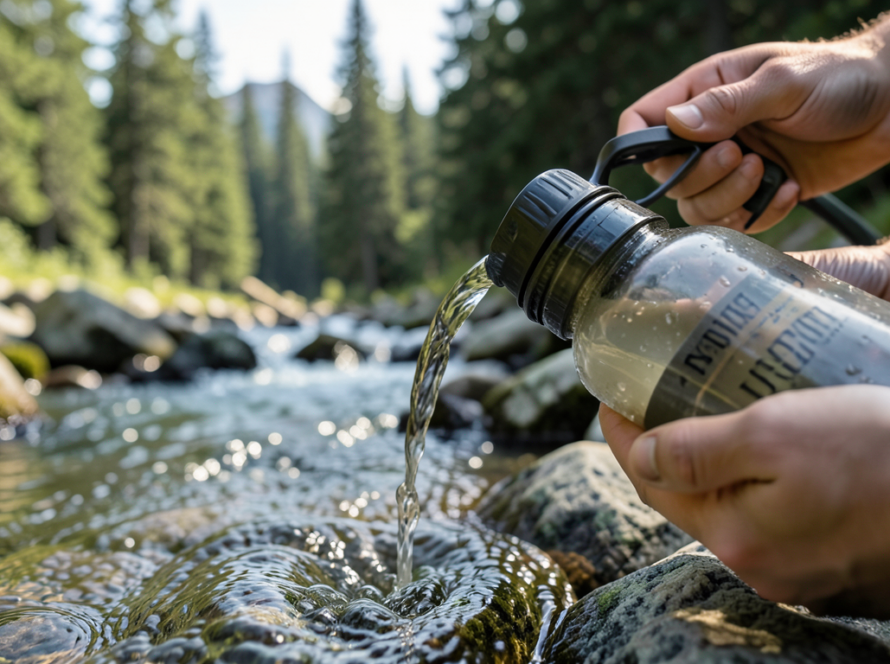
Layer 3: Purification capability. This is for when stored water runs out. I’ve tested dozens of filters. For home use, I keep a Sawyer PointONE with the bucket adapter and a Katadyn Pocket filter as backup. The Sawyer handles volume (filters up to 100,000 gallons), the Katadyn is bombproof and field-serviceable.
You also need to know your local water sources. Where’s the nearest creek, pond, or lake? In a two-week power outage, you’ll need to source water. Even a swimming pool can be purified for non-drinking use, saving your clean water for consumption.
Don’t forget water for sanitation. If the water system fails, you need water to flush toilets. Fill bathtubs when you know a storm is coming. A WaterBOB is a 100-gallon bladder that fits in a standard tub—I’ve used these during hurricane preps in Louisiana.
Food: Beyond the Pantry
The goal isn’t to stockpile MREs and freeze-dried meals (though those have their place). The goal is to extend your normal food supply and add shelf-stable options that don’t require refrigeration or cooking.
Start with a two-week pantry extension. Buy extra of what you already eat—pasta, rice, canned goods, peanut butter, oats. Rotate through it. This isn’t “prepper food,” it’s just a deeper pantry.
Then add no-cook options. When the power’s out and you’re rationing fuel, you don’t want meals that require 30 minutes of boiling. I keep:
- Canned proteins: tuna, chicken, salmon, beans
- Nut butters and nuts (high calorie density)
- Dried fruit and granola bars
- Crackers and hardtack-style breads
- Instant oatmeal and cold cereal
- Powdered milk and protein powder
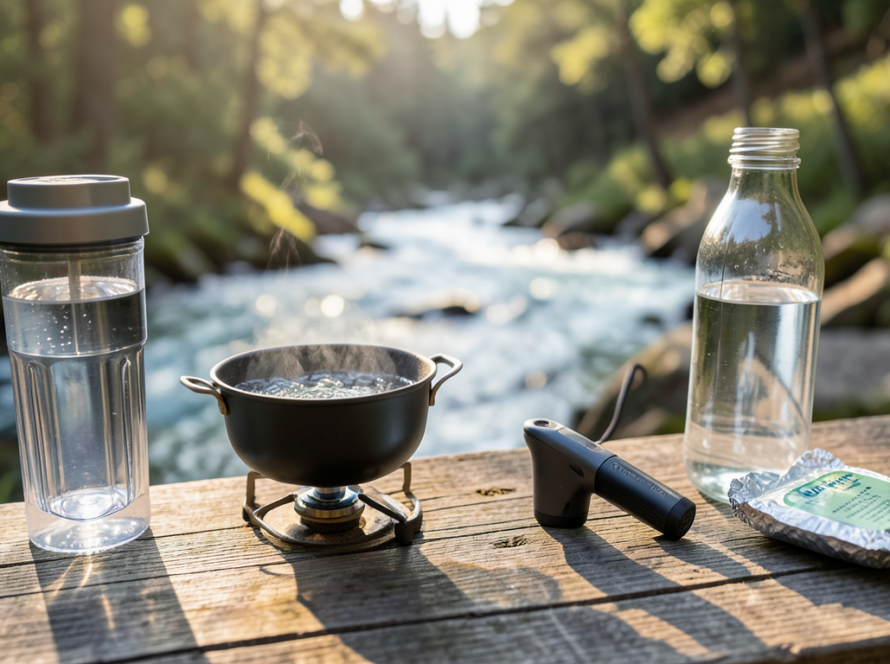
For cooking, you need redundancy. Your stove probably runs on electricity or natural gas. Both fail in disasters. I have three backup cooking methods:
Propane camp stove: A two-burner Coleman-style stove with a dozen one-pound bottles. These are cheap, reliable, and you can cook indoors with proper ventilation (crack a window). A single bottle gives you about two hours of cooking time.
Charcoal grill: Already in most backyards. Twenty pounds of charcoal will cook for a week. You can also use it as a heat source if you’re in a cold-weather emergency.
Rocket stove or wood-burning option: For extended outages, you’ll run out of propane and charcoal. A simple rocket stove runs on twigs and small branches. I built one from concrete blocks in about 10 minutes.
Calories matter more than variety in a crisis. An average adult needs 2,000-2,500 calories per day. Under stress or in cold weather, that goes up. Do the math on your supplies. A can of tuna is 180 calories. A jar of peanut butter is 2,800. Plan accordingly.
Shelter and Climate Control
Your home is your primary shelter, but you need to maintain it when systems fail. The two big challenges are temperature regulation and weather protection.
For cold weather, most people underestimate how fast a house loses heat. In a winter power outage, an unheated house in Minnesota will drop below freezing in 24-48 hours. You’re not heating the whole house—you’re creating a warm zone.
Pick one room, preferably interior and small. Close it off with blankets over doorways. Body heat from multiple people in a small space makes a difference. I’ve kept a 10×12 room at 55°F when it was 20°F outside, just from body heat and insulation.
For additional heat, options are limited and dangerous. Space heaters need electricity. Propane heaters produce carbon monoxide. I use a Mr. Heater Buddy with proper ventilation—crack a window an inch, use a CO detector, never run it while sleeping. A 20-pound propane tank will run it for 50 hours on low.
Sleeping bags rated for 20°F below your expected indoor temperature work better than piling on blankets. A good bag traps body heat. Blankets just sit there.
For hot weather, the challenge is different. Heat kills faster than cold in many scenarios. Without AC:
- Create cross-ventilation with open windows and battery-powered fans
- Hang wet sheets in doorways—evaporative cooling drops temperature 10-15°F
- Stay in the coolest part of the house (usually basement)
- Wet bandanas around the neck and wrists
- Avoid physical activity during peak heat
I learned this in the Southwest—shade and airflow matter more than anything else. If you have vulnerable people (elderly, very young, medical conditions), hot weather power outages are evacuation-level emergencies.
For weather protection, know your home’s weak points. Where does water come in during heavy rain? Where do high winds cause damage? I keep plywood pre-cut for windows in hurricane country, and I know which trees could hit the house in a storm.
Tarps are underrated. A 20×30 heavy-duty tarp can cover a damaged roof section, create a dry outdoor workspace, or be rigged as additional shelter. I keep four in different sizes, plus 200 feet of paracord and a box of bungee cords.
Light and Power
You need light that doesn’t depend on the grid. I’ve tested everything from candles to solar generators. Here’s what actually works:
Flashlights: One per person, plus spares. I prefer 18650 rechargeable battery models—brighter and cheaper to run than disposables. Keep them in known locations. In a nighttime emergency, you don’t want to be digging through drawers.
Headlamps: Better than flashlights for anything requiring hands. I use these more than any other light source during outages.
Lanterns: For area lighting. LED lanterns run for days on D-cells. I have three—one for the kitchen, one for the main living space, one for the bathroom.
Solar options: A small solar panel (50-100 watt) with a charge controller and battery bank can keep phones, radios, and lights running indefinitely. I run a 100-watt panel to a 100Ah lithium battery. It’s not powering refrigerators, but it handles communication and lighting.
Candles are cheap backup, but they’re also fire hazards. If you use them, use real candle holders, never leave them unattended, and keep them away from anything flammable. I’ve seen house fires start from emergency candles.
For power, manage expectations. You’re not running your whole house on a portable generator unless you’ve spent $5,000+ on a whole-home system with transfer switch. A $500 generator will run a refrigerator, some lights, and charge devices—if you have fuel.
Gasoline storage is its own challenge. It goes bad in 3-6 months without stabilizer. I keep 15 gallons with PRI-G stabilizer, rotated through vehicles every six months. That’s enough to run a 2,000-watt generator for about 30 hours, or to evacuate if gas stations are down.
Communication and Information
When cell towers lose power or get overloaded, your phone stops working. I’ve seen this in every major disaster. You need communication systems that don’t depend on infrastructure.
Battery-powered radio: NOAA weather radio with alert function. This is how you get official emergency information when the internet is down. I use a Midland ER310—it has hand crank and solar charging as backup.
Two-way radios: FRS/GMRS handhelds for family communication. Range is 1-2 miles in real conditions (not the “36-mile” marketing claims). These let you coordinate when split up during evacuations or when someone needs to leave the house during an emergency.
Ham radio: If you’re serious about communication, get your Technician license. A basic handheld ham radio can reach repeaters 20-50 miles away, and the ham community is active in every disaster. I’ve passed health-and-welfare traffic for people when phones were down.
Offline information: Download maps of your area. Print important documents. Keep a physical notebook with emergency contacts, medical information, and important account numbers. When your phone dies and you can’t charge it, paper works.
Establish communication plans with family. Where do you meet if separated? Who’s the out-of-state contact? (Local calls often fail when long-distance still works.) What’s the evacuation plan? Everyone needs to know this before the emergency.
Medical and Hygiene
Your first aid kit needs to handle more than cuts and scrapes. In a multi-day emergency, you’re dealing with blisters, burns, sprains, infections, and chronic medication needs.
I build medical kits in layers. Basic kit handles minor injuries. Intermediate adds trauma supplies. Advanced includes prescription medications and specialized equipment.
Basic supplies everyone needs:
- Adhesive bandages in multiple sizes
- Gauze pads and rolls
- Medical tape and butterfly closures
- Antibiotic ointment
- Pain relievers (ibuprofen, acetaminophen)
- Anti-diarrheal medication
- Antihistamines
- Tweezers, scissors, thermometer
- Disposable gloves
For trauma: tourniquet (CAT or SOFTT), Israeli bandage, chest seals, QuikClot gauze. I’ve used these in backcountry accidents. They save lives, but you need training. Take a Stop the Bleed course—they’re free and take two hours.
Prescription medications are the hard part. Most insurance won’t cover early refills for emergency stockpiling. Talk to your doctor about getting 90-day prescriptions instead of 30-day. Refill at 75 days. This builds a small buffer. For critical medications (insulin, heart meds, etc.), this isn’t optional—it’s life or death.
Hygiene becomes critical after 48 hours. When water is limited and showers aren’t happening:
- Baby wipes for body cleaning
- Hand sanitizer (at least one gallon for a family)
- Toilet paper (more than you think—figure one roll per person per three days)
- Feminine hygiene products
- Toothbrushes and toothpaste
- Soap and shampoo
- Garbage bags for waste management
Sanitation is where disease starts in disasters. If toilets don’t flush, you need a plan. Bucket toilet with bags and sawdust or kitty litter. Seal and dispose of waste properly. This isn’t pleasant to think about, but dysentery is worse.
Security and Safety
Most emergency situations don’t involve security threats. But extended outages and evacuations create opportunities for theft and violence. I’m not fear-mongering—I’m acknowledging that when people get desperate, behavior changes.
Basic security measures:
Awareness: Know who’s around. In a neighborhood outage, coordinate with neighbors. Mutual aid is better security than isolation.
Lighting: Motion-sensor lights (battery or solar) around entry points. Criminals avoid lit areas.
Hardening: Reinforce doors with longer screws in strike plates. Security film on ground-floor windows. Lock everything, even in your own yard.
Communication: Two-way radios with neighbors. If someone needs help, you can coordinate response.
Self-defense: This is personal choice and location-dependent. I’m not giving specific recommendations, but if you own firearms, you need training and secure storage. A gun you don’t know how to use is a liability.
The best security is not looking like a target. Don’t advertise your supplies. Don’t run a generator at full volume while the rest of the neighborhood is dark. Don’t tell everyone you’re “fully stocked.” Operational security matters.
Fire extinguishers belong in this section. When fire departments are overwhelmed or can’t reach you, a small fire becomes a disaster. I keep ABC-rated extinguishers in the kitchen, garage, and bedroom hallway. Check pressure gauges annually.
Important Documents and Financial Prep
You need copies of critical documents in waterproof, fireproof storage. When you evacuate or your home is damaged, you’ll need these for insurance claims, identification, and accessing accounts.
Keep copies of:
- IDs and passports
- Insurance policies (home, auto, health)
- Property deeds and titles
- Medical records and prescriptions
- Bank account information
- Emergency contacts
- Photos of valuables for insurance claims
Store originals in a safe deposit box or fireproof safe. Keep copies in a waterproof document bag in your evacuation kit. Digital backups on an encrypted USB drive add another layer.
Cash matters. In a power outage, credit cards don’t work. ATMs don’t work. I keep $500 in small bills ($1, $5, $20) in the safe. This covers gas, supplies, or emergency purchases when electronic payment fails.
Skills Trump Gear
The best emergency prep is knowledge. You can buy every item on these lists and still be helpless if you don’t know how to use them.
Critical skills to develop:
Fire starting: Practice lighting fires with matches, lighters, and ferro rods in different conditions. Wet wood, wind, limited materials. Do this before you need it.
Water purification: Actually use your filter. Know how to backflush it, what the flow rate should be, how to tell if it’s clogged. Read the manual.
First aid: Take a wilderness first aid course or EMT basic. Book knowledge isn’t enough—you need hands-on practice.
Navigation: Learn to read paper maps and use a compass. GPS fails. Phones die. Map and compass work forever.
Food preservation: Know how to keep food safe without refrigeration. What spoils fast? What lasts? How do you tell if something’s unsafe?
Basic repairs: Plumbing, electrical, carpentry. You don’t need to be an expert, but you should be able to stop a leak, patch a hole, or secure a door.
Practice your plans. Do a 48-hour blackout drill. Turn off the main breaker and live on your preps. You’ll discover what you’re missing and what actually works. I do this annually, and I learn something every time.
Building Your System Over Time
Don’t try to do everything at once. Emergency prep is a process, not a purchase.
Month 1: Water and food basics. Get to 72 hours of supplies.
Month 2: Light, heat, and cooking. Add backup systems for climate control.
Month 3: Medical and hygiene. Build your first aid kit and sanitation supplies.
Month 4: Communication and documents. Get your radio and organize paperwork.
Month 5: Skills training. Take a class, practice with your gear, run drills.
Month 6: Extend to two weeks of supplies. Refine based on what you’ve learned.
This isn’t a race. A solid 72-hour capability beats a half-assed 30-day stockpile. Build depth before breadth.
Budget matters. I’ve built complete emergency systems for under $500 by buying gradually and focusing on essentials. You don’t need expensive gear—you need gear that works and knowledge to use it.
Regional Considerations
Your location determines your priorities. Hurricane zones need evacuation plans and wind protection. Earthquake zones need structural safety and quick-access supplies. Wildfire areas need go-bags and air filtration.
Check your county emergency management website. They publish hazard assessments and recommended preparations specific to your area. This is free, local, and more relevant than generic advice.
Climate affects everything. Water storage in Arizona requires different solutions than water storage in Maine. Food that’s shelf-stable in Montana might spoil in Florida. Adapt these principles to your environment.
Urban, suburban, and rural prep looks different. Urban means limited storage space but nearby resources. Rural means more space but longer response times. Suburban is middle ground. Scale your approach accordingly.
The Mindset Component
Gear and supplies are the easy part. The hard part is staying calm when things go wrong.
I’ve seen people with perfect gear fall apart in emergencies because they panicked. I’ve seen people with almost nothing handle crises effectively because they stayed focused.
Mental preparation means:
Accepting that emergencies happen. Not living in fear, but acknowledging reality. Your area will face disasters. Preparation reduces impact.
Making decisions under stress. Practice this in small ways. When something breaks, fix it yourself instead of calling someone. When plans change suddenly, adapt. Build the muscle.
Managing family stress. Kids feed off adult anxiety. If you’re calm and prepared, they’ll be calmer. If you’re panicking, they’ll panic worse.
Knowing when to shelter and when to evacuate. This is the hardest decision. Have criteria decided in advance. If X happens, we leave. If Y happens, we stay. Don’t make this call in the moment.
Resilience is a skill. You build it by handling small challenges successfully, which gives you confidence for bigger ones.
Free Resource: 72-Hour Kit Checklist
Building your first emergency kit? I’ve put together a comprehensive 72-hour kit checklist that covers everything in this guide in a printable, actionable format. It includes specific quantities, storage tips, and a timeline for building your kit without breaking the budget.
Download the free 72-Hour Kit Checklist here and start building your foundation today.
Frequently Asked Questions
How much money do I need to start emergency prepping?
You can build a functional 72-hour emergency kit for $200-300 by focusing on essentials: water storage containers, shelf-stable food you already eat, a basic first aid kit, flashlights, and a battery-powered radio. Start with what you have—most people already own 40% of what they need. Buy a few extra cans of food each grocery trip, fill empty juice containers with tap water, and gather flashlights and batteries from around the house. The biggest expense is usually water storage containers and a quality water filter, but even these can be acquired gradually. Avoid the temptation to buy expensive tactical gear or freeze-dried meals when you’re starting out. A $15 water filter and $50 in canned goods will serve you better than a $200 tactical backpack.
What’s the difference between bugging out and sheltering in place?
Sheltering in place means staying in your home during an emergency, using your supplies and preparations to ride out the situation. Bugging out means evacuating to another location. Most emergencies are shelter-in-place situations—power outages, winter storms, short-term disruptions. You have more supplies at home, better shelter, and familiar surroundings. Bug out only when staying is more dangerous than leaving: mandatory evacuations, house fires, chemical spills, approaching wildfires, or flooding. The decision criteria should be established before the emergency. If local authorities order evacuation, you leave. If your home becomes structurally unsafe, you leave. If you can’t maintain safe temperature or access water, you consider leaving. Bugging out requires a destination—you’re not just driving away, you’re going to a specific place (family, friends, hotel, shelter) with a planned route and supplies in your vehicle.
How do I maintain and rotate emergency supplies?
Set calendar reminders every six months to check your supplies. For food, use the first-in-first-out method—put new purchases behind old ones and eat the oldest first. Most canned goods last 2-5 years, but rotate them through your regular meals anyway. Water in sealed containers lasts indefinitely, but I refresh stored water annually and rotate bottled water every six months. Check batteries twice a year—test them and replace any that are weak. Inspect first aid supplies for expiration dates, especially medications and ointments. Run your generator under load for 30 minutes every quarter and change the oil annually. Test your water filter by running a gallon through it. Check propane tank levels and fuel stabilizer dates. This maintenance takes about two hours twice a year and prevents the common problem of discovering expired or failed supplies during an actual emergency. The key is making it routine, not something you remember to do randomly.
Should I tell neighbors and friends about my emergency preparations?
This depends on your relationship and their attitude. Close neighbors you trust can be valuable mutual aid partners—you coordinate resources, watch each other’s property, and help during emergencies. I’ve been part of neighborhood prep groups that shared skills, bulk-purchased supplies, and established communication plans. This works when everyone contributes. The problem is broadcasting your preparations widely. If you’re the known “prepper” on the block, you become the target when people get desperate. I don’t advertise my supplies to casual acquaintances or on social media. I also don’t lie if asked directly by someone I trust—I just don’t volunteer details about quantities or specific capabilities. A good middle ground is encouraging others to prepare without revealing your own depth. Share information, recommend starting points, offer to help them build their own kits. A prepared neighborhood is safer for everyone than being the only prepared household surrounded by desperate people.
What’s the most commonly overlooked aspect of emergency preparedness?
Sanitation and waste management. Everyone thinks about food and water, but almost nobody plans for what happens when toilets don’t flush after three days. Without running water, your bathroom becomes unusable fast, and improper waste handling leads to disease—cholera, dysentery, and hepatitis spread through poor sanitation. You need a bucket toilet system with heavy-duty bags, absorbent material (sawdust, kitty litter, or peat moss), and a plan for waste disposal. You also need significantly more toilet paper than you think, hand sanitizer by the gallon, and cleaning supplies. The second most overlooked aspect is the psychological impact of extended emergencies. People prepare gear but not mindset. After 4-5 days without power, with limited food variety, no showers, and uncertainty about when things return to normal, stress breaks people down. Kids get scared, adults get short-tempered, and family conflict escalates. Having entertainment (books, cards, board games), maintaining routines, and keeping people occupied makes a huge difference in family cohesion during extended emergencies.